
Sega Dreamcast Clock battery replacement
Sega Dreamcast internal battery Change mod
Frustratingly The dreamcast has an internal cr2302 battery which is soldered to the board, After the sega saturn having a removable panel on the back of the console making the battery extremely easy to change you would think Sega would follow this for the release of the Dreamcast. Not only is the battery sealed in the console it is not easily removable. This is because it is soldered to the board.
If you have some basic soldering skills it can be changed.
Before you start
Make sure the Dreamcast console is unplugged from the power source and turn it on whilst it is unplugged. This is to make sure the Capacitors discharge. I forgot to do this when changing mine and ended up with a shock from it and boy it woke me up!
Tools needed to change the Sega Dreamcast Battery
- A philips Srewdriver
- Soldering iron
- Solder
- Flux
- A cr2032 Battery holder
- Cr2032 Battery
- Pliers


Opening a Sega Dreamcast console

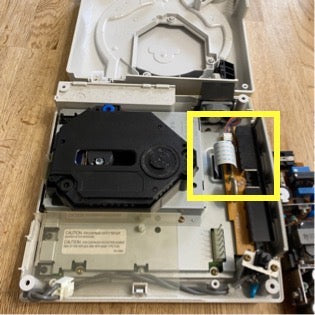
There are 4 philips screws that need to be taken out as pictured below the first 3 are visible the fourth becomes visible when you remove the expansion slot cover ( this is indicated by the yellow square)
 Once you have removed the screws you the top cover just lifts off to reveal the inside of the console

Next we need to remove the power board
Red square- Remove the screw and the white clip from the board
blue circle- Remove the screw
Green square- this is just a clip that you just want to pop the board out of before lifting the board, if you look just above the blue circla in the photo above there is a white block. This contains 8 pins that connect the board to the sub board so the board needs to be lifted at this point to release it from the console.


In the Yellow square above you can see the 4 screws that hold the controllers board in place. It is on this board that the battery is contained. Remove the 4 screws
 The battery is in the yellow circle in this photo
Next the white ribbon cable needs to be removed in the photo above

Lastly the connector can be removed which will release the board from the console.

With the board out use the pliers to straighten the 3 prongs in the photo above. They can be identified as the sit in a triangular shape. Then it is time to add some flux and get the soldering iron on to remove the battery. This can be a pain as the 3 prongs are fixed so it is difficult to remove them. The Battery will get hot from the heat transfer so use the pliers on it to hold once removed make sure the 3 holes are cleared so the new battery holder slots in then solder it to the board.
once finished wip off the excess flux, put the battery in and and it is time to put it back together.
Putting the dreamcast back together
1. Put the connection block back on
2. attach the ribbon cable to the console and controller board
3. screw the 4 screws back in to secure the controller board
4. attach the power board
5. put the 2 screws into the power board
6. attach the clip back on the power board and the wire block
7. attach the lid and screwin the 4 screws
once turned on the time and date can be set and will hold into the console and the next time it goes the battery can easily just be changed after removing the 4 screws.